Showing posts with label DIY Day. Show all posts

Tuesday, June 1, 2010

Garden Gift Idea


I have some friends that I needed a "garden themed" gifts for and yes- I thought of a pot as a basket with seeds and flowers and tools in it. But while at the garden shop, I found a gardening gift that is easy to put together. All you need is a packet of seeds, a bar of nice soap,(and my friends need lots of soap!) a hand spade and some twine! Simply place the seeds, then the soap in the blade of the spade/trowel, then tied up with a little gardeners twine or raffia! They also had some seed packets matched with children's garden tools(In the bucket, sorry I didn't get a pic of those!) that were pretty cool for little gardeners as well.These will make great gifts for a new home. Or a new garden. Or kids (and adults) that like to dig in the dirt.
and

Tuesday, May 25, 2010

Solar Powered Tiki Torches

Okay so I don't win any Buy nothing challenges. When I walked in the dollar store in Burien they had solar pathway lights. I bought a few. Then I walked in the store last week and they had TIKI TORCHES! Well I put the old noggin in gear and came up with solar powered tiki torches...I have seen these for sale on the interwebs, the cheapest being around $10 to $20, For $2 at the Dollar Store (Dollar Tree) all I had to do was manipulate the threaded hole on the tiki torch with a plier,to make it big enough to shove the solar light into, then I shoved in the solar light minus the pointed stake. I like it-- no messy lamp oil to worry about, no wicks. No Fires, No explosions.

Tuesday, May 18, 2010

One For Da Guys

Vegetable Skewers on my Wheel of Fire BBQ

I love the gals in these blog post parties, but every once in awhile I think us guyz need to examine our masculine side. No I don't mean grab a beer and scratch something. I mean a manly topic. you know. Grill something. Just in time for Memorial Day and Father's Day!
Below is a grill I made out of a truck tire wheel. I have taken it to BBQ's and beach parties. And it drove over the competition!
IT was easy to make- I just put four "Capita" Furniture legs from IKEA through the holes of the wheel, and tightend them. Then I made an "ash catcher"- First I put a disposable aluminum pie tin to cover the axle hole, and then for the coals, I cut out some hardware cloth. Just measure out the cloth slighty bigger than the wheel in circumfrence, and push it down- this is where your coals will sit. And for topping it of I bought a replacement grill for a Weber BBQ, but you could use those old ones off of those disposable BBQ's as well. And I put a big metal tray on the bottom to catch any ash that might fall through! There you have it- a BBQ Grill that's ready to roll! And it is unique. Perfect for the beach or tailgate parties.


Tuesday, May 11, 2010

2nd Hand Planter-

What's this? A 2nd party post? it's A DIY Quickie!- I painted this terra cotta plant pot sage green. Then I stuck it in this basket I got from a garage sale. I think it looks good!

Monday, May 10, 2010

DIY Produce Bags

I am getting into using my own Produce bags. What I have done before is just put the orange or banana or apple with my other groceries on the checkout belt without a bag, for some reason checkout clerks hate that! Or I just reuse the produce bags and Big Bertha, the check out clerk never is the wiser! I just wash them (rarely need too) and stuff them in my pockets when I go to the store. But then I get to think about the eco- mantras about not using more material… and I start to think maybe there is a better way! And every so often I need sturdy little produce bags. So I got to thinking (always dangerous) about how I could I, make my own produce bags, even though I don't sew?
BURLAP BAGS:
I got these cool burlap bags that my raspberry plants and some strawberry plants came in. Just add a draw string and voila! A produce bag! Probably make great Christmas wrappings too
These little burlap bags are easy to add a drawstring to- or a shoestring -which I had lying around
Originally they came with these paper clamp thingys- another great way to keep the top closed!

Mesh Produce Bags:

MESH BAGS
I made these up from those little mesh bags from Trader Joe's- You know the ones that new/baby potatoes, avocados and limes come in? Super easy to put a drawstring through, simply weave the string through the mesh holes about every fourth hole.

Tuesday, May 4, 2010

Bike Racks and A Mother's Day Present

The Sustainable Burien group, to which I belong, wanted a bike rack for an upcoming event at the Wild Strawberry Fest. Here is what I came up with for them:

I took an old futon bed's rails that I found at Mom's Dumpster, and I originally was going to make porch railings from them. But I got the idea to make the bike rack from them. I found they were a tad small heighth wise, so I cut out the tops on every other post, and set them up so they would have a bike on each side. I tried them out with the old bikes I had around and they work! Hopefully the bike group at Sustainable Burien likes them as well!

CAUTION! MOM :MOTHERS' DAY SPOILER ALERT
If
You
are my
mother...
STOP
scrolling
down
NOW!


As for mom for mothers day, I found this neat Garden Hod style basket at a garage sale, and put in some garden tools, seeds, gloves and tomato plants in the hope that she gets approved for the community garden- If she doesn't she can grow a kiddie pool garden at my house!

Monday, April 26, 2010

Pot/Pan Lid Rack to Mag Rack

I wanted one of those fancy wall hung magazine racks to hang one my coat wardrobe, so I took an IKEA pot/pan lid rack for hanging lids for the pots and pans, bent the lid hooks in just a tad and now have a wall hung mag rack! Since I already had the rack (cause I bought 2 when I bought them for lids), it was like free!

Tuesday, April 20, 2010

DIY THREE-TIER STRAWBERRY PLANTER


I have always lusted after these three tier planters for strawberries. But I have always shuddered at the price. $50?? At the risk of becoming known as Cheap Vegetable Gardener JR, I figured I could make one that would work as well as the store bought one. Well my dumpster diving has again come to the rescue. Remember a few weeks ago I rescued a kiddie pool out of mom's dumpster at the apartment complex? That is the base for my three tier planter. A concrete tree round is the second tier. A pot one of my apple trees came in with the bottom cut out is the top tier. added the strawberry plants and some kinnick kinnick or Bear berry ( a native fruit bearing ground cover) and I have a three tier strawberry planter minus the sprinkler through the middle- I figure since I prefer to water by hand it was not necessary.

My homemade DIY three tier planter- not as pretty but it should do the job- we'll see during the season how it works!

Tuesday, April 13, 2010

Seed Cups

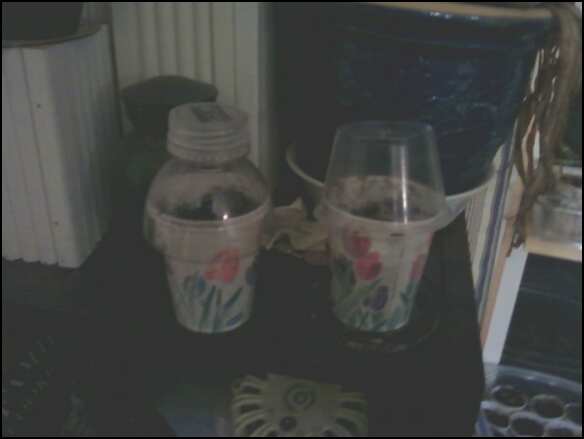
For today's DIY/2nd Time/Trash to treasure post, I put up something you can easily do with your kids. It may seem juvenile, but hey, that's the idea! All it takes is a Small cup or yogurt container, and old bottle, some growing medium (peat or coco noir) and a sunny window ledge, and some seeds- I suggest pumpkin or sunflower- easier for little hands to manage, In my home version I used bok choy and chard.
The store bought version of Ferry Morse's Seed Cup

I was in Lowes and saw these Ferry-Morse Kid's Cups; a single mini green house that comes with three or four seeds, a jiffy pot and a peat pellet in a dixie cup. I have no doubt that you could make these at home, but I yielded into temptation and bought a couple of kid's cups.
But I felt immense guilt upon coming home. So I put a creative freak on and came up with my own! I just took a dixie cup, filled it with Coco Noir (I personally try to stay away from peat as much as possible, cut the top of a discarded water bottle to make a "dome". In another one I used a plastic condiment cup for the dome that some corn salsa came in.


My home DIY version Seed Cups.

This one has a dome cut off a water bottle, I used a second Dixie cup to catch the water.

The lid from the condiment container became a drip pan for the bottom of the cup.


I would think yogurt containers would work great for these, as would juice box cups and milk cups. I suppose you could decorate the cups, I found the floral motiff good enough. And I will see which does better- the plants grown from the Store bought "Seed Cups" or the Home made version that is made from discarded materials.

Tuesday, April 6, 2010

Small chairs for the garden!


Another Dumpster Dive and more Junk to play with. I found these two kids chairs, and decided right away that they would make great planters. The legs are hollow as is the seat, so I just cut a hole in the seat of the chairs, filled with dirt and put in some marigolds!

Tuesday, March 30, 2010

B*TCHIN BENCH DUDE!

Back outside for some more garden furniture this week: My Gnarly, Bitchin' Garden Bench!
SENOR FROG is playing a salute to the bench on his fiddle!
I am often inspired by my Uncle who makes benches out of water skis and snowboards. I had this old Skateboard deck laying around, so I decided to honor family tradition and make a bench out of it. I buried two pieces of fencing pole in the ground, set with cement, attached wood adapters to them to hold the deck, and bolted on the deck. My neighbors 7 year old boy said it is Bitchin' dude!


Monday, March 22, 2010

STOP! Do Not Enter...

Remember last year I made a bar table for the porch out of a Stop sign and some plumbing parts? Well guess who is at it again.
This is a Do Not Enter Sign that made a perfect table top for a hefty metal base that I found rummaging through Mom's dumpster. What would I ever do without mom or her dumpster? Anyway it will be a companion piece for the Stop table.

The Bar table will have a companion this year!

Tuesday, March 16, 2010

Light Bulb Vase

Well for DIY DAY, Trash to treasure Tuesday and a picture says a thousand words, Here is a hanging vase I made from a crapped out light bulb. I simply followed these instructions except I made the hanger out of an old wire hanger by disassembling it, straightening it, drilling two holes in the screw on part of the light bulb, bending then ends and inserting them in the light bulb. Something trashy, something recycled, something reused!

Tuesday, March 9, 2010

Mom's Sideboard and Cabinet

This is a repost of an earlier post.

The cabinet was easy to hack out- And yes I made the pot holder next to it

Mom needed a sideboard in her when she moved in to her apartment- but it couldn't be too deep and need to clear a 2 foot long baseboard heater.

I made my mom a sideboard and cabinet using IVAR cabinets, a 1X12X6 foot pine board and some mackis office storage units-
http://www.ikea.com/us/en/catalog/products/30032387
I mounted the mackis units in a group of three , reversed the drawers and put knobs on them. I also mounted a shelf below for added stability, yet high enough t clear the small baseboard heater safely. I used wooden drawer knobs from home depot for the feet

Tuesday, March 2, 2010

Low Impact B-Day gift

The ugly old Naugahyde that was the original covering to the headboard

With new batting. Ready for mom to pick out new fabric!

My mom's Birthday was last Friday- she wanted a Headboard for her bed. Since I found a new headboard (another dumpster dive) I took the old head board off my bed, removed the fabric, wrapped it in batting. Then I tacked a Jo Ann's gift card on it so she can go and get the fabric she wants for it. She was surprised as this head board was originally in her parents house, then her guest room for a while, then at my house. See we don't throw things like furniture away in my family. That's how we roll.


Tuesday, February 23, 2010

Time Oh Give Me Time


I have here a couple of clocks from some old IKEA mirrors. One had a broken mirror, so I took that out and replaced it with a tile I found at lowes. Drilled a hole through the center with a mason bit. Added a clock work and Instant Clock. The mirrored one I took the mirror out, and with a glass drilling bit, drille a hole through the center and another clock kit and poof - Instant clock for the Vain one in us all- You can look at time and yourself at the same time! Both of these are available in my etsy shop!

Tuesday, February 16, 2010

Charge It!!!


I must tell you I love my new cell phone. It holds a charge like forever. The only problem is when I charge it I lose it. After making charging stands for every one but me at Christmas, I decided it was my turn-First I found a decent style wooden box at the thrift store, then I sanded it and painted it sage green, (wish I had taken a before pic).

I drilled a hole big enough for the charger plug to go through.


I plugged it in to a power strip that is easily turned off when not charging or running the lap top. A charging stand for my cell phone. Too easy and great. And it holds pencils and pens!


While you are visiting enter my giveaway to win a package of Basil Mix Seed Balls

Tuesday, February 9, 2010

Let there be Light

Can you tell there is a CFL in the lamp?
The cord (I even used a grommet and an out door rated plug!)


And on the first day, Rob saw it was dark (Out on the patio) And so he took the old porch light from the old front door before the home addition, and wired it like a lamp Plugged it inand all of a sudden there was light. Rob could see and it was good.

Tuesday, February 2, 2010

A Two-Fer!!!

Out of a thrift store candlestick and what I assume was a planter, I made two things-


A Tea light holder

A desk lamp.

I drilled a hole on the bottom of the planter for a lamp shade adapter, attached said adaptor, and decided it would look better if I drilled a series of holes around it. And I think it does! Makes a great little lamp for my desk in the mess room, helps me see the bills when I pay them (downside).


Since you are here, why not enter my blog-iversary giveaway for a $15 Lowes gift card?

Tuesday, January 26, 2010

Earth friendlier Magazine Organizers

As promised, here are a few magazine organizers I made out of cereal and cracker boxes. I prefer to use up gift wrap on mine, although I got creative one day

and made a decopauge using old car pics out of magazines for my car mags.


Easy to make- just follow the directions here. And yes I keep the bag the cereal is in. I use them as a non stick paper to roll cookies out in. Or in place of wax paper when preparing a meal- but they do melt in the oven. I also use them when I cover something in the microwave!


Since you are here, why not enter my blog-iversary giveaway?